Games Art and Design

Games Art and Design

Thursday, 24 November 2016

       This week we've been looking at basic AI, getting them to do a variety of tasks such as following the player character and patrolling an area of the level.


      I used a 'pawn sensing' node for my ai, which means that it won't do any of the actions you give to it unless it sees the player.


      In order to get my ai to navigate through the entire level, I had to use nav link proxies in order for the nav mesh to become completely traversable.

Monday, 21 November 2016


      One of the main mechanics in my game is the scan function which will allow the player to see more of the environment for a brief amount of time. In order to do this, I needed to create a few blueprints that interlocked with each other.


This blueprint lies in the character blueprint, and will spawn a pulse depending on whether or not the player has enough energy, and if there isn't an active pulse already out.


The pulse blueprint. It's made of a visual aspect and a collider, that will cause a change in the material of the object.


This is the blueprint for the 'reveal' function that will allow the player to use the pulse to see.


This week, during the workshop we went through the basics of creating a character hud, and linking what is on screen to the different functions within the game.

      It wasn't too hard to design a HUD for the game that the player would be able to use, although I think that further iterations on the design might make it less 'in your face' for the player.


      This week, we looked at Variables and how we can use them to create a variety of functions within our games.
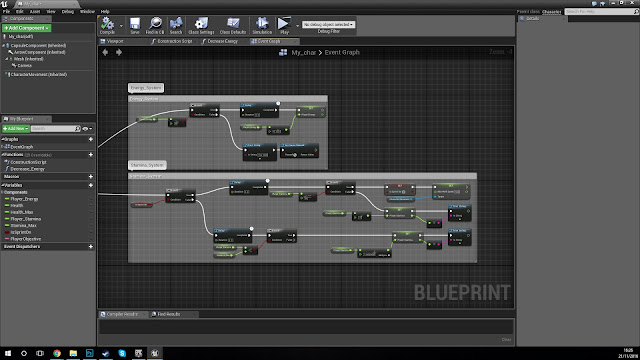
Outside of the lecture, I followed a series of tutorials that further explained some of the functionality of variables, and I ended up with a couple of systems for player resources - one for energy, the other for stamina.

      For the stamina system, I wanted to limit how long the player could sprint for, only letting them move faster while they had enough stamina. I created this system using floats and a boolean. While I could have used integers, I decided that it would be easier to make incremental changes to the values of the variables with floats. The boolean is used as a check to see if the character is sprinting, and whether or not the system should deduct or add value to the system.

      The energy system above it was much simpler to construct as I simply wanted to have the energy start at the maximum, with the energy value being constantly reduced to enable a resource management mechanic into the game.

      This is the blueprint for the energy pickups that I made - they're currently simple cubes, but that will change in the future. To start with I had to cast the object's trigger volume to the character, which would then allow the object to be picked up, removing the object afterwards so that there isn't an infinite number of energy pickups for the character to use.

      The past week I've begun to focus more on getting the game to look how I want it to, so that it can be an effective prototype. I've included models for a variety of things, as well as going through the level design for the prototype.

      The objects I made are only simple shapes that can be reused for a variety of different objects when they are morphed. For example, the energy pickups are just the crate model that I made that I then stretched in-engine.

      This has let me go from the starter content, into something that is much more inline with what I want the world to look like.


      For the title of my game, I decided to go with 'Defect', as it sums up the theme of the general narrative of how I want the game to be like, it also gave me an idea for how I wanted the character to move, which was the aim of this week's workshop.

The first stage of getting your character to move is to create some inputs in the project settings. Doing this allows you to call the function using a variety of methods, such as using a mouse/keyboard or a gamepad.


Next, is setting up the nodes within the character so that the character will react to the inputs you have just made. I had to use a float*float node on the 'pitch' input in order to have a regular looking mode, instead of having it inverted.


This image shows where I attached the camera (to the neck of the character, instead of to a camera boom). This provides a shake when walking to simulate the effects of being a defective machine, as well as allowing the player to be in a more immersive first person mode.

      At the same time as working on developing the prototype, i have also started to work on a 3D model, specifically a door, which will be produced as though it were going into a game, able to be blueprinted so that it can function in-game.

Wednesday, 28 September 2016

      This week we were asked to come up with at least 10 games using random words. I used a random phrase generator to come up with the titles for my games.

Macho Dinosaur Showdown:
Choose your dinosaur and begin your quest!
Experience the prehistoric world in a way never seen before. Customise your dinosaur with a variety of ‘matcho’ costumes and armours as you fight across the expansive open world of Pangaea in order to save the world from disaster (And the King of the Mammals) as you defeat increasingly difficult enemies in dark souls meets WWE style gameplay.
Consoles + PC
Teen


Birth of a New Day:
Experience the undead in a whole new way. You are a zombie, made undead against your will. You have to find the person who made you this way and take revenge while finding enough brains to keep you lucid, all without drawing attention to yourself. Make your way through this open world sandbox game with a compelling narrative that leaves you wondering ‘why?’
Consoles + PC
Teen

On The Ropes:
A tightrope dating simulator. Choose a partner and then see how well you match by walking a tightrope with the other person. Overcome obstacles and keep your balance to see how well you paired up.
Wii U
Young Adult

Keep on Truckin':
A driving game where you have to avoid other drivers who are blocking the road. It gets progressively harder as time goes on.
Consoles
All Ages

Fish out of Water:
You're a fish from the fishmongers at a supermarket that has fallen off the ice. You have to make your way back up to the ice before you go off in 'I am Bread' style gameplay.
Consoles/PC
All Ages

On Cloud Nine:
Platformer. A new drug called 'C9' has hit the streets and you've accidentally taken some, causing the world around you to constantly shift. Avoid the authorities as you try to make it home.
All Platforms
Teen+

Keep your Shirt on:
Platformer. Everytime you jump your shirt lifts up. You have to traverse the level before your shirt goes over your head and you can no longer see.
All Platforms
All Ages

No Ifs, Ands or Butts:
Brain Trainer where you have to beat your teacher through a series of puzzles to eventually leave the classroom, only to moon the rest of the class.
Hand-held Consoles
Teen+

I Smell a rat:
There's a mole in the mafia. While it isn't you, you are the main suspect. The way that you interact with other characters, and how you act in the world will affect how the NPC's view you. Find the true culprit before you get taken out.
Consoles
18+

What Am I, Chopped Liver?:
Platformer. Collect all the pieces of liver to become whole again. Defeat bosses and avoid traps along the way.
All Platforms
All Ages

Happy as a Clam:
Fighting Game. Your pearl was stolen from you while you slept. Defeat the other clams in the ring to discover which one stole it.
All Platforms
All Ages

Burst your Bubble:
Platformer. Rise to new heights by jumping from bubble to bubble, with each bubble popping after it's used. Gain power ups to leap further and be careful of environmental changes.
Mobile
All Ages

In the Red:
 Grandmother's footstep's meets mariokart. Be the first to finish the course using power ups, and avoiding the penalties caused by the random red-light, green-light system.
Consoles
All Ages

Monday, 26 September 2016


      For the Character, I want the design to be distinctly robotic, while having some human elements to not distance the player from the character too much. I feel like with the whole atmosphere of my game, it's a good idea to get the aesthetic of possibly the only entity in the game, correct.
      I really like the look of hydraulics and cabling in robots and mechs, as it gives them a little more definition, a little more believability, while also allowing from quite a bit of variance in design. I also feel like it could be a good idea to, given the supposed state of the mech, put some damage into his design, and then have that affect the way that the character moves, handicapping the player in more ways than one.


      I mainly looked at abandoned factories and warehouses to get a good idea of what I want the mood of the whole thing to be, and I quite like the muted blues and purples, mixed in with the occasional bright spot as it would change the tone from something macabre, to something far less sinister.
      Not only that, but it could be an idea that the aim of the game is to effectively return the player's sight by some means, revealing the vibrancy of the colours only after the game has finished and you've travelled however far in darkness, only able to see in black and white for the duration of the game.

      All in all, I think that these mood boards will help me to begin designing the characters and later, some of the sorts of environments that would be seen throughout the game.
      With the start of a new year, we've been given the task of creating a prototype game around the (Titular?) theme of 'Inference'.
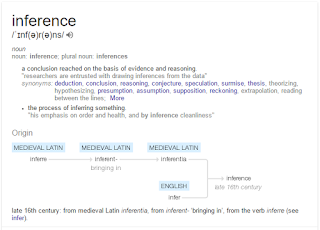
      To help myself come up with ideas for an interesting game that I could make, I first got the explicit definition of the word:


      Inference is all about connecting implicit clues together to come to a conclusion. I think that the word can also apply to drawing information from your surroundings to have a subtly higher understanding of your environment based on what your senses are telling you.

      After a quick brainstorm, I had the idea of the player being blind, unable to see, to use their most common sense, but instead, they would use another sense to draw information on their environment. Perhaps, they would only be able to see their character through the lens of a security camera or something akin to a sonar pulse emitted from the character once every few seconds (player activated?) that would help the player to navigate their way through the level. 

      I feel as though this idea works best in a sci-fi, tech-based setting, as it would be easier to portray a robot with the ability to simultaneously see and not see (Matrix?).

      In order to get a good design for my character(s?) and the environment, I need to create a couple of mood boards, one for environment, the other for character concepts. The environment doesn't need to be particularly complex, and while neither does the character, I feel like it should be quite a colourless, drab environment. Perhaps dirty and grungy, as though it is an area that has been left to decay for too long and the character a (broken? discarded?) robot has awakened without parts of itself functioning.

Thursday, 5 May 2016


Self Evaluation

      Throughout the course of this unit I feel as though I have developed my skills really well, going from someone with little to know knowledge on 3D software or the different processes to someone who is confident in their ability to create a variety of objects and get them ready for use as game assets.

      The work that I have produced may have started out as reflective of my ‘beginner’ status in the 3D world, but I feel like I have progressed to a point where I could call myself an intermediate, looking at the final two projects that I have submitted, both of which are readied game assets. The pillar looks as though it could have come from an early horror game on the ps2 or the xbox, while my time machine is embedded into a map that I made, and it is animated, which I previously didn’t know how to do.

      I think the easiest part of this unit has been the modelling section, as although I made mistakes at the beginning, that was to be expected, and as time has gone on I’ve got more confident in my ability to create recognisable objects, improving my workflow and the processes that I use to create objects, keeping in mind how the item would be built in the real world so that I can split the model up into those segments and using floating geometry wherever necessary in order to create the illusion of reality in my models.

      What I found to be the hardest part of this unit is probably baking. At first, I didn’t understand UV mapping, but I’ve got at least a basic grasp on that, however, it is the caging of the high poly model which I found - especially with my pillar model which was comprised of organic shapes - to be something actually pretty frustrating, because it has to be done just right, otherwise the cage won’t work and it becomes a repeating back and forth process where you’re constantly retrying to get the cage done right.

      I’ve really enjoyed the 3D portion of this year, as I feel like I’ve really learned something new, and been pushed to investigate all the different areas of this part of the subject.


      Having finished the model that I’ d be submitting, I decided that I would continue on, and try to create the version that I imagined at the start of the project, hoping to teach myself a little bit more about mapping and about UE4.


      I managed to get the centrifuge pieces to spin in UE4 using blueprints, and the lighting effects come from attaching ‘sparks’ to the ends of the model and increasing their size so that when they spin the create a spinning circle of energy.


      This is the final render of my time machine. I’m pretty happy with the way that it turned out, and I’ve begun to enjoy the process of making game assets and having them appear in UE4, able to move and be interacted with.
     
      I think that if I were able to do the project again, now that I’m more aware of the constraints that we were put under, I would do something smaller so that while my model would be smaller, it would also have much more detail on it.


      Artist: Grigory Dolzhenko. Really like the look and feel of the weapons he makes, very crisp models and texturing.


      Really enjoying this artist’s work as a mixture of both 2D and 3D work using matte painting to get the look of PBRs. Art done by Lars Sowig.

      Coming into the final week now, I’m happy with where I’m at in terms of my model and what I can do using 3D software, and I’m looking forward to implementing that into my 2D work and getting back into painting.


      Once all of the models had been texture, I put them into UE4, plugging all of the texture maps that I’d made into the UE material editor and attaching each material to its corresponding model.
A couple of times i went back and forth between UE4 and Quixel, editing
the maps that I’d made if the look I got wasn’t quite what I was hoping for.

      With just a 10k triangles limit, I had to cut out a large part of the generator (and surrounding environment), leaving me with just the core of the time machine as the model.


      It’s easy to forget the scale that you’re working in when you’re using a program like maya, but putting it into UE4 provides let’s you see how big or small the model is when compared to a person.

      I like the fact that my model seems so large because that’s the effect that I was going for when presented with the task, instead of creating something small enough that you’d be able to step inside it.


Phenomenology

      One of the games that I have found makes you extremely aware of your body, is Alien: Isolation. I think that this effect is fairly typical of the horror genre, but especially so within this game.

      As the ‘action’ as it were gets more intense and you get more and more adrenalin going through your body, your breathing gets harder and faster. This is a huge problem in this stealth horror-survival game as there is a setting in which you can turn on your microphone, allowing the AI humans and Aliens to hear you if you make too much noise. While this mechanic isn’t intrinsic into the game, if you are playing with a gaming headset on and the setting turned on, then the experience of being onboard a collapsing space station, being quite literally stalked through the run-down areas by an Alien that is stronger, faster and has an acute sense of hearing becomes all the more terrifying.

      I think when games passively make you aware of yourself, they immerse you into the gameworld so much more than if you were to interact with the game via touchscreen or through a camera system like the kinect, especially when that game is set in the first person, making you believe that the character’s emotive state is your own as you get drawn into the terror of being chased by something that you can hear crawling around the map above you, while also being able to hear you if you move too quickly, or if you are foolish enough to knock something in the environment over.

      I used the pillar as a sort of a test run for all of the other parts to my model, following the same basic process of UV map, Highpoly model, Cage followed by baking the normal and ambient occlusion maps before texturing the model inside Quixel, using the smart materials to quickly generate the type of material that I want to use and then going through the different maps and editing them so that the material looks how I want it to.


      A quick before and After putting the low poly model into UE4 and applying the material to it.

      It’s a fairly simple method of texturing, but the I quite like the results, although I think that there might be too much ‘wear and tear’ on the material as it stands at the moment, so I’ll have to go back and edit that.


      Having UV mapped and Baked this part of the model, I used quixel to quickly generate a metallic material that would look like something you could find in the service tunnels of a high-tech facility. I wanted to include bits of wear on the material so that it would look as though the metal had reacted to the high amounts of energy coming off of the generator and the portal.


      Next came UV mapping, I started out by doing an automatic projection to get the faces into recognisable groups, before doing a planar project on faces that had the same direction to get good UV islands.

      Once that was done I needed to make a highpoly version of my mesh so that I could bake and texture it.