Games Art and Design

Games Art and Design

Thursday, 24 November 2016

       This week we've been looking at basic AI, getting them to do a variety of tasks such as following the player character and patrolling an area of the level.


      I used a 'pawn sensing' node for my ai, which means that it won't do any of the actions you give to it unless it sees the player.


      In order to get my ai to navigate through the entire level, I had to use nav link proxies in order for the nav mesh to become completely traversable.

Monday, 21 November 2016


      One of the main mechanics in my game is the scan function which will allow the player to see more of the environment for a brief amount of time. In order to do this, I needed to create a few blueprints that interlocked with each other.


This blueprint lies in the character blueprint, and will spawn a pulse depending on whether or not the player has enough energy, and if there isn't an active pulse already out.


The pulse blueprint. It's made of a visual aspect and a collider, that will cause a change in the material of the object.


This is the blueprint for the 'reveal' function that will allow the player to use the pulse to see.


This week, during the workshop we went through the basics of creating a character hud, and linking what is on screen to the different functions within the game.

      It wasn't too hard to design a HUD for the game that the player would be able to use, although I think that further iterations on the design might make it less 'in your face' for the player.


      This week, we looked at Variables and how we can use them to create a variety of functions within our games.
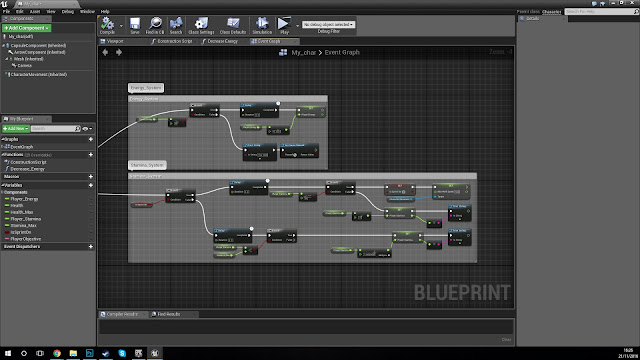
Outside of the lecture, I followed a series of tutorials that further explained some of the functionality of variables, and I ended up with a couple of systems for player resources - one for energy, the other for stamina.

      For the stamina system, I wanted to limit how long the player could sprint for, only letting them move faster while they had enough stamina. I created this system using floats and a boolean. While I could have used integers, I decided that it would be easier to make incremental changes to the values of the variables with floats. The boolean is used as a check to see if the character is sprinting, and whether or not the system should deduct or add value to the system.

      The energy system above it was much simpler to construct as I simply wanted to have the energy start at the maximum, with the energy value being constantly reduced to enable a resource management mechanic into the game.

      This is the blueprint for the energy pickups that I made - they're currently simple cubes, but that will change in the future. To start with I had to cast the object's trigger volume to the character, which would then allow the object to be picked up, removing the object afterwards so that there isn't an infinite number of energy pickups for the character to use.

      The past week I've begun to focus more on getting the game to look how I want it to, so that it can be an effective prototype. I've included models for a variety of things, as well as going through the level design for the prototype.

      The objects I made are only simple shapes that can be reused for a variety of different objects when they are morphed. For example, the energy pickups are just the crate model that I made that I then stretched in-engine.

      This has let me go from the starter content, into something that is much more inline with what I want the world to look like.


      For the title of my game, I decided to go with 'Defect', as it sums up the theme of the general narrative of how I want the game to be like, it also gave me an idea for how I wanted the character to move, which was the aim of this week's workshop.

The first stage of getting your character to move is to create some inputs in the project settings. Doing this allows you to call the function using a variety of methods, such as using a mouse/keyboard or a gamepad.


Next, is setting up the nodes within the character so that the character will react to the inputs you have just made. I had to use a float*float node on the 'pitch' input in order to have a regular looking mode, instead of having it inverted.


This image shows where I attached the camera (to the neck of the character, instead of to a camera boom). This provides a shake when walking to simulate the effects of being a defective machine, as well as allowing the player to be in a more immersive first person mode.

      At the same time as working on developing the prototype, i have also started to work on a 3D model, specifically a door, which will be produced as though it were going into a game, able to be blueprinted so that it can function in-game.